2025. 2. 17. 14:34ㆍSpringboot/security
전체코드 : https://github.com/gks930620/spring_securty_all
프로젝트 세팅
https://start.spring.io/ 에서 프로젝트를 생성합니다.
필요한 library는
Spring Data JDBC,H2 Database, Spring Data JPA, Spring Web, Thymeleaf,
Spring Boot Devtools , Lombok, Spring security 입니다.

application.yml
spring:
  datasource:
    url: jdbc:h2:mem:security
    driver-class-name: org.h2.Driver
    username: sa
    password:
  h2:
    console: # H2 DB를 웹에서 관리할 수 있는 기능
      enabled: true           # H2 Console 사용 여부
      path: /h2-console       # H2 Console 접속 주소
  jpa:
    hibernate:
      ddl-auto: create
    properties:
      hibernate:
        show_sql: true
        format_sql: true
        default_batch_fetch_size: 100
    open-in-view: false
  devtools:
    livereload:
      enabled: true
    freemarker:
      cache: false
    restart:
      enabled: true
  thymeleaf:
    cache: false


logging:
  level:
    org.hibernate.SQL: debug
    org.hibernate.type: trace
Security를 제외한 부분에 대해서는 따로 자세한 설명은 생략합니다.
또 spring boot는 3, spring security 6을 기준으로 코드를 작성합니다.
Spring security 동작 원리
Spring security 가 적용되지 않았을 때

Spring security 가 적용됐을 때
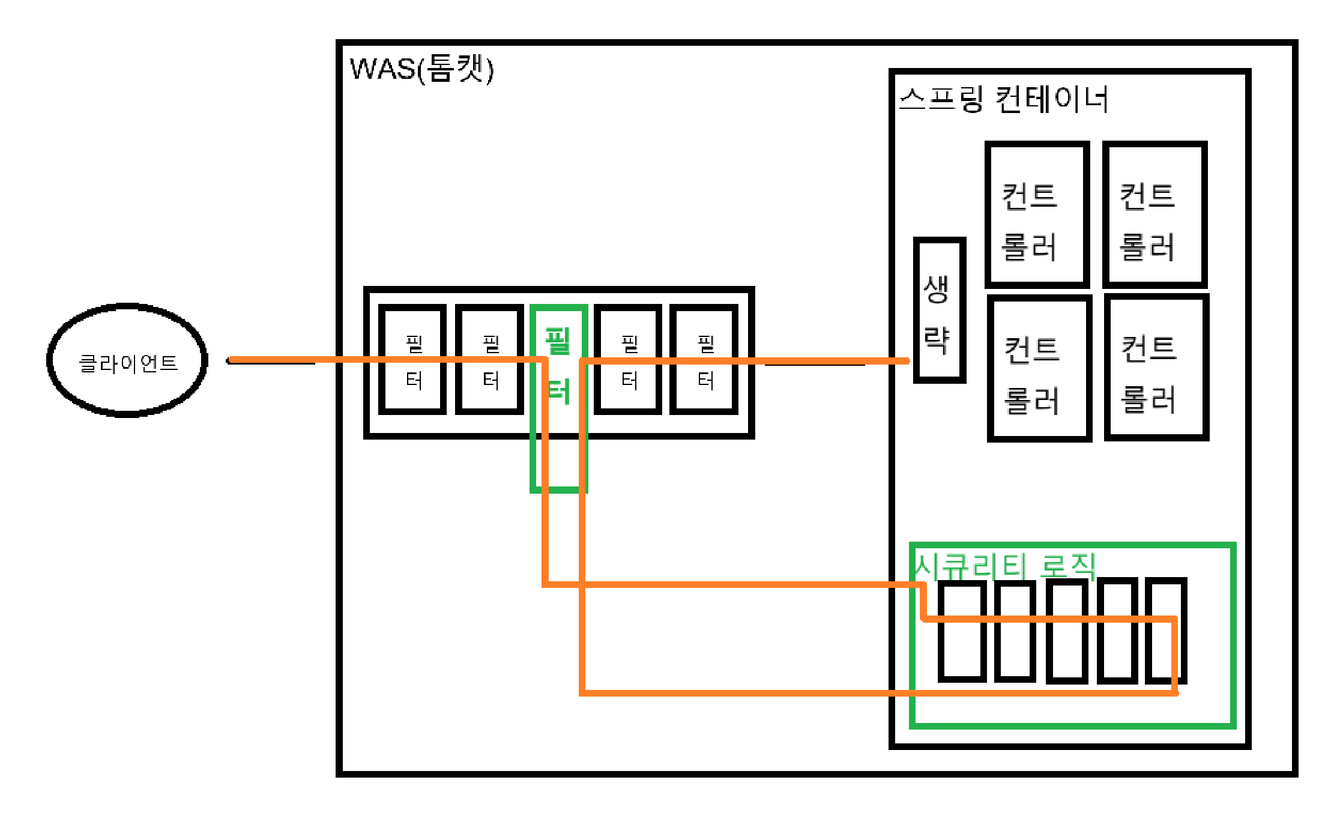
기본적으로 security는 필터 방식이고, 여러가지 security filter들을 통해 기능을 수행한다.
시큐리티 로직에 많은 필터들이 있고 이 필터들이 chain처럼 연결 되어있어서
SecurityFilterChain이라고 한다. 즉 시큐리티로직 = SecurityFilterChain.
SecurityFilterChain에 등록될 필터들을 공부하고 알맞게 SecurtiyFitlerChain에 설정한 후
SecurtiyFitlerChain을 빈으로 등록하면 된다
여기서 설정하는 내용에 대해 seucrity 필터들이 동작하지만
어떤 필터들이 어떻게 동작하는지를 다 알필요는 없고 설정한 내용의 의미만 알면된다.
이 여러 필터중에 우리가 이해해야 할 내용은 로그인 과정과
로그인 성공 후 로그인정보 사용하는 법이다.
이 부분은 다음다음 글에 자세히 적어놨다.
SecurityConfig 기본 설정
@Configuration   //Spring에서 설정 파일임을 나타냄.
@EnableWebSecurity
//Spring Security의 보안 설정을 활성화하는 애너테이션(annotation)
// Spring Boot 2에서는 필수였지만, Spring Boot 3에서는 생략가능. but security설정임을 명시
public class SecurityConfig {

    @Bean //security는 password를 DB에 저장할 때 인코딩해서 저장.  비교할 때는 디코딩 후 비교.
    public PasswordEncoder bCryptPasswordEncoder() {
        return new BCryptPasswordEncoder();
    }

    @Bean
    public SecurityFilterChain filterChain1(HttpSecurity http) throws Exception{
        http
            .authorizeHttpRequests(auth -> auth
                .requestMatchers("/h2-console/**").permitAll() // H2 콘솔 접근 허용
            )
            .csrf(csrf -> csrf.ignoringRequestMatchers("/h2-console/**")) // H2 콘솔 CSRF 비활성화
            .headers(headers -> headers.frameOptions(frame -> frame.disable())); // H2 콘솔을 iframe에서 허용

        http.authorizeHttpRequests((auth) -> auth
            .requestMatchers("/join/**", "/login").permitAll()    // 이 url들은 로그인 안해도됨
            .requestMatchers("/admin").hasAuthority("ADMIN")   //ADMIN 권한 사용자만
            .requestMatchers("/my/**").hasAnyAuthority("ADMIN", "USER")  // ADMIN, USER 권한 중 하나 가지면 ㅇㅋ
            .anyRequest().authenticated()   // 그 외 요청들은 로그인해야만..
        );


        http.formLogin((auth) -> auth.loginPage("/login")   // login페이지 URL 지정.  @RequestMapping("/login")을 만들어야한다.  => login.html
            .loginProcessingUrl("/loginProc")   // login.html에서  form태그의 action URL이  /loginProc여야한다.
                                                // @RequestMapping("/loginProc")는 없다. login과정은 security가 하기때문.
            .defaultSuccessUrl("/")             // 로그인 성공 후 redirect 되는 URL
            .permitAll()
        );

        http.logout((auth) -> auth.logoutUrl("/logout")   //   /logout으로 요청하면 logout이 된다.  @RM은 없다. 로그아웃도 security가 한다.
            .logoutSuccessUrl("/"));                     //    로그아웃 성공 후 /로 redirect


        http.csrf((auth) -> auth.disable());   //보안관련설정. 자세한 설명은 csrf 따로.
        return http.build();
    }
}
※ hasAuthority, hasRole 차이
직역하면 권환과 역할이지만 security가 이를 구별해서 사용하지는 않는다.
SeucirtyConfig에서 hasAuthority("ADMIN")이면
CustomUserDetails의 권한 값을 비교할 때 "ADMIN" 그대로 비교하고
hasRole("ADMIN") 이면 "ROLE_ADMIN"으로 비교한다.
security는 권한과 역할 관리를 위해 hasAuthority,hasRole을 둘다 제공하지만 (의미상 각각에 맞는 역할이 있음)
securirty를 처음에 접할 때는 그냥 값을 똑같이 비교하는 authority를 사용하는게 좋다.
※ 참고 . 이전 버전 SpringConfig
spring boot 2.7 이전버전
WebSecurityConfugreAdpater를 상속받음.
@Configuration
public class WebSecurityConfig extends WebSecurityConfigurerAdapter {

    @Override
    protected void configure(HttpSecurity http) throws Exception {

        http
            .authorizeRequests()
            .antMatchers("/").authenticated()
            .anyRequest().permitAll();

    }
}
Spring boot 3.1이전. 상속대신 @으로.
@Configuration
@EnableWebSecurity
public class SpringSecurityConfig {

    @Bean
    public SecurityFilterChain filterChain(HttpSecurity http) throws Exception {

        http
            .authorizeHttpRequests()
            .requestMatchers("/admin").hasRole("ADMIN")
            .anyRequest().authenticated();

        return http.build();
    }
}
springboot 3.1이후부터는
메소드체인방식대신 람다방식으로 작성.
※ CSRF
개발에는 csrf 설정을 disable 해도 되지만. 배포에서는 csrf 설정을 해줘야 한다.
SecurityConfig에서는 http.csrf((auth) -> auth.disable()); 을 없애면 된다.
즉 csrf에 대한 설정이 없으면 security 는 기본적으로 post요청 시 csrf를 검증한다.
그래서 POST요청을 보낼 때 csrf 토큰을 항상 같이 보내야 한다.
<form action="/loginProc" method="post" name="loginForm">              <!--  securityConfig의  loginProcessingUrl("/loginProc")    -->
    <input id="username" type="text" name="username" placeholder="id(username)"/>   <!-- name이 반드시 username이어야한다.  -->
    <input id="password" type="password" name="password" placeholder="password"/>  <!-- name이 반드시 password이어야한다.  -->
    <input type="hidden" name="_csrf" value="{{_csrf.token}}"/>
    <button type="submit" >로그인</button>
</form>
참고로 ajax post 요청을 보낼 때는 상단 <head> 태그 안에 추가하면 됨.
<meta name="_csrf" content="{{_csrf.token}}"/>
<meta name="_csrf_header" content="{{_csrf.headerName}}"/>