2025. 2. 28. 17:52ㆍSpringboot/security
전체코드 : https://github.com/gks930620/spring_securty_all
yml파일에서 client registration의 google을 추가합니다
참고로 google 같은 경우 provider 값을 security가 갖고있기 때문에
따로 설정해주지 않아도 됩니다.
동작 방식은 https://brilliantdevelop.tistory.com/218과 같습니다.
dotenv:
  enabled: true  # .env파일설정.    KAKAO_CLIENT_ID 직접 쓰려면 없어도됨.
spring:
  datasource:
    url: jdbc:h2:mem:security
    driver-class-name: org.h2.Driver
    username: sa
    password:
  h2:
    console: # H2 DB를 웹에서 관리할 수 있는 기능
      enabled: true           # H2 Console 사용 여부
      path: /h2-console       # H2 Console 접속 주소
  jpa:
    hibernate:
      ddl-auto: create
    properties:
      hibernate:
        show_sql: true
        format_sql: true
        default_batch_fetch_size: 100
    open-in-view: false
  devtools:
    livereload:
      enabled: true
    freemarker:
      cache: false
    restart:
      enabled: true
  thymeleaf:
    cache: false


  security:
    oauth2:
      client:
        registration:
          kakao:
            client-id: ${KAKAO_CLIENT_ID}  # 카카오 REST API 키
            #client-secret: ${KAKAO_CLIENT_SECRET}  # 선택 (일반적으로 필요 없음)
            redirect-uri: http://localhost:8080/login/oauth2/code/kakao # 카카오 로그인 후 리디렉트될 주소
            authorization-grant-type: authorization_code  # OAuth2 인증 방식 (코드 방식)
            scope:
              - profile_nickname
              - account_email  # 요청할 사용자 정보 (이메일, 닉네임)


          google: # ✅ 구글 OAuth2 추가
            client-id: ${GOOGLE_CLIENT_ID}
            client-secret: ${GOOGLE_CLIENT_SECRET}   #구글은 인가코드- access_token 과정에서 내부적으로 secret을 필요로 함.
            scope:
              - profile       #카카오는 profile안의 여러정보 다 따로 지정해줘야하지만 구글은 profile만 지정하면 됨.
              - email
            authorization-grant-type: authorization_code
            redirect-uri: http://localhost:8080/login/oauth2/code/google


        provider:
          kakao:
            authorization-uri: https://kauth.kakao.com/oauth/authorize  # 카카오 로그인 URL  (인증서버)
            token-uri: https://kauth.kakao.com/oauth/token  # 액세스 토큰 요청 URL (인증서버)
            user-info-uri: https://kapi.kakao.com/v2/user/me  # 사용자 정보 요청 URL (리소스서버)
            user-name-attribute: id  # OAuth2User에서 사용할 식별 값. 왠만하면 oauth에서 제공하는대로사용하자. 카카오는 id, 구글은 sub


#          google:  #security 가 구글provider에 대한 정보를 갖고 있어서 추가안해도됨.
#            authorization-uri: https://accounts.google.com/o/oauth2/auth  # ✅ 인증 서버 (Authorization Server)
#            token-uri: https://oauth2.googleapis.com/token  # ✅ 액세스 토큰 요청 (Token Server)
#            user-info-uri: https://www.googleapis.com/oauth2/v3/userinfo  # ✅ 사용자 정보 요청 (Resource Server)
#            user-name-attribute: sub  # ✅ Google의 고유 사용자 ID (sub)


logging:
  level:
    org.hibernate.SQL: debug
    org.hibernate.type: trace


#    google:
#      client-id: your-client-id
#      client-secret: your-client-secret
#      # 다른 설정들은  이미 설정되어있음   client-authentication-method: client_secret_basic으로 .
#      # redirect-uri :  http://localhost:8080/login/oauth2/code/google 기본이지만 실제 서비스에서는 변경
#      # provider의 user-name-attribute도 구글에서 사용하는 유저객체 식별 속성이고 정해져있기 때문에 provider쪽
#      scope:
#        - profile
#        - email
구글 OAUTH 설정
구글 클라우드- 콘솔

새 프로젝트 만들기
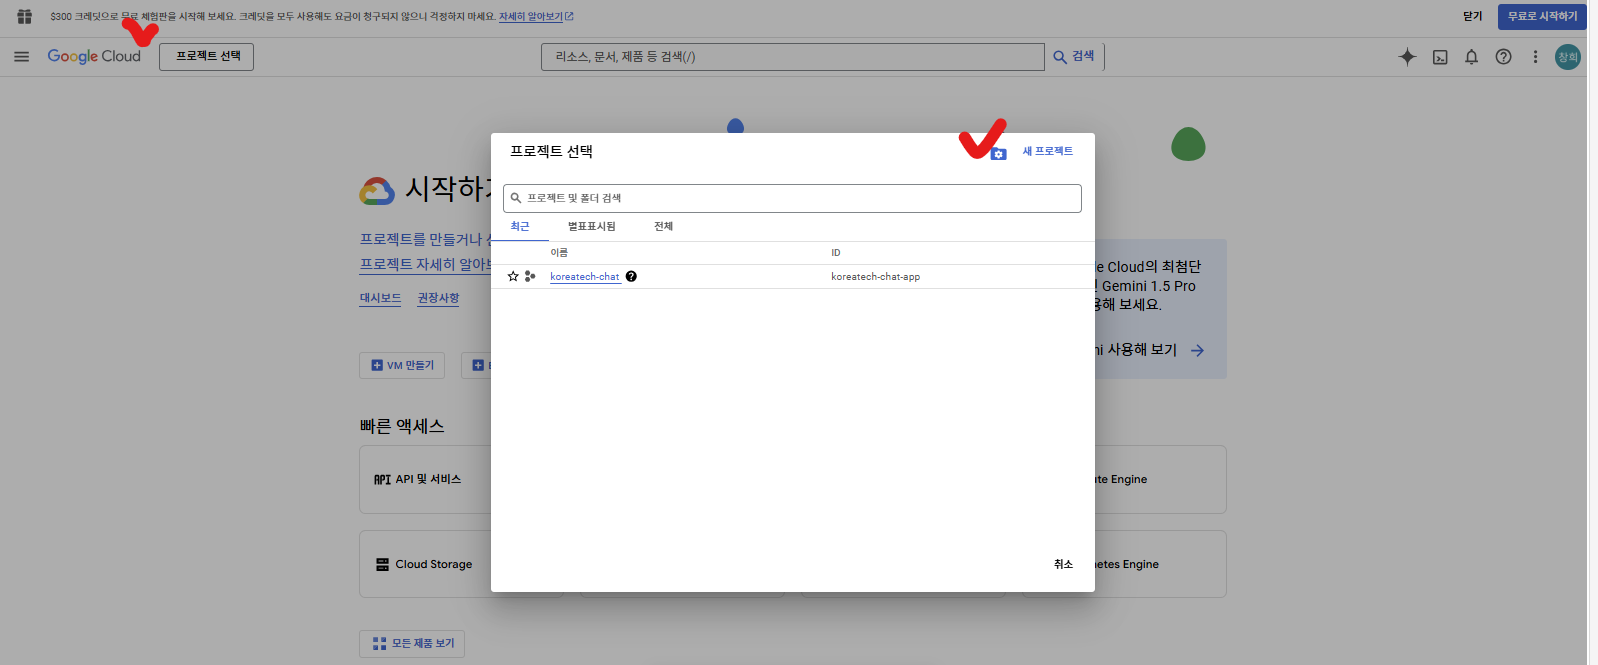
프로젝트 선택

사용자 인증 정보 선택 (최종적으로 여기에 보이는 사용자 인증정보+Oauth 동의화면을 설정해야함)

사용자 인증 정보- OAuth 클라이언트 ID 만들기

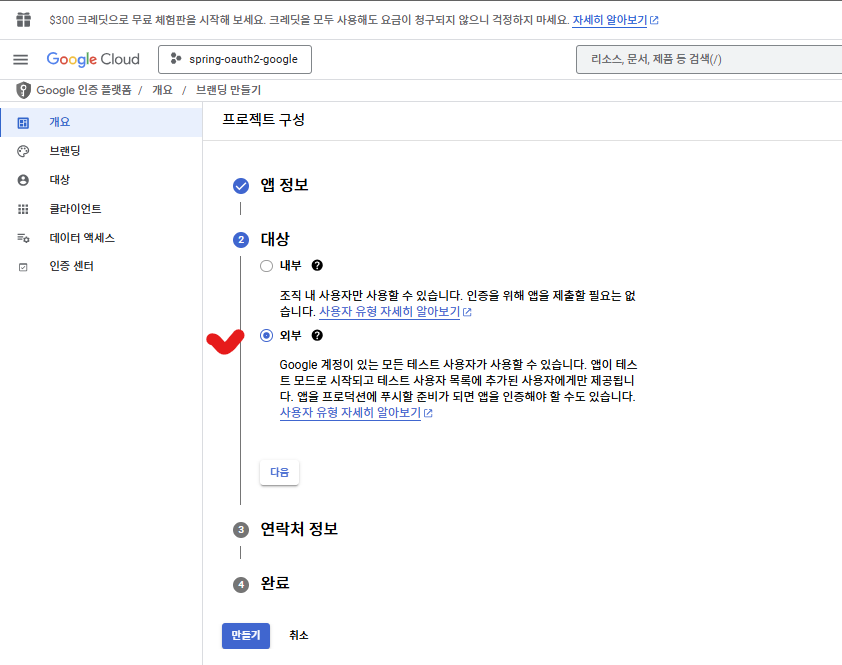
OAuth 클라이언트 ID 만들기 전에 동의화면 구성을 하라고 한다.

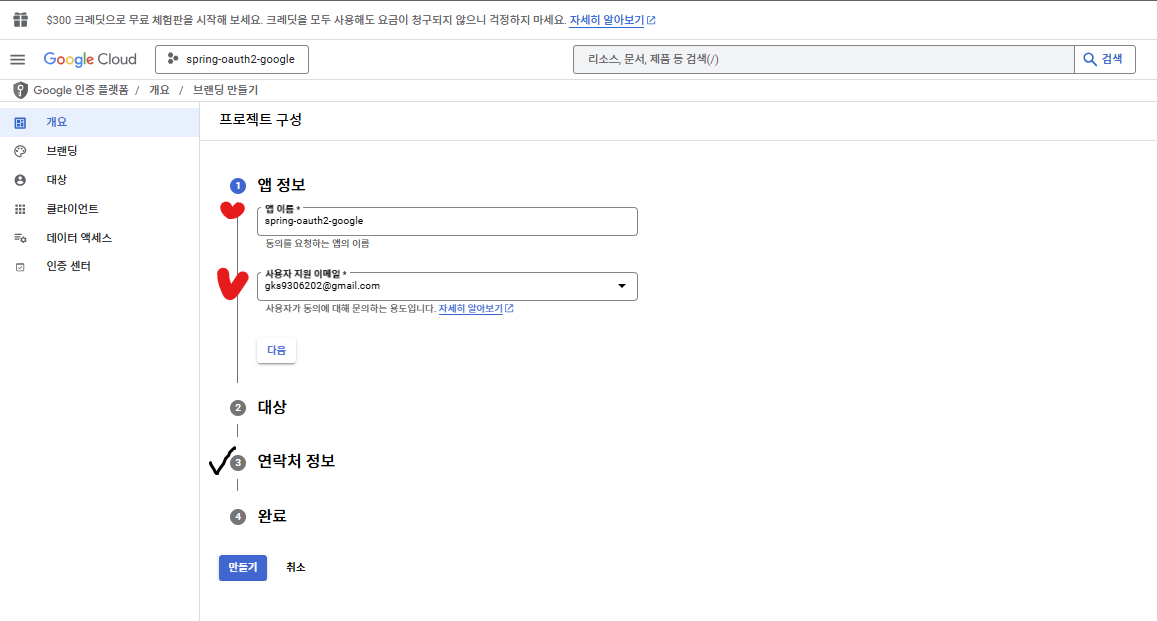
앱 동의화면 구성
- 여기서 사용자 지원 이메일은
구글로그인 실패, API 사용량 등에 관한 안내메일을 받을 개발자메일이다.

내부는 내가 따로 등록한 구글계정만 허용
외부는 구글계정가진 누구나 허용.
연락처 정보도 앱정보 사용자지원 이메일과 똑같이해주자.
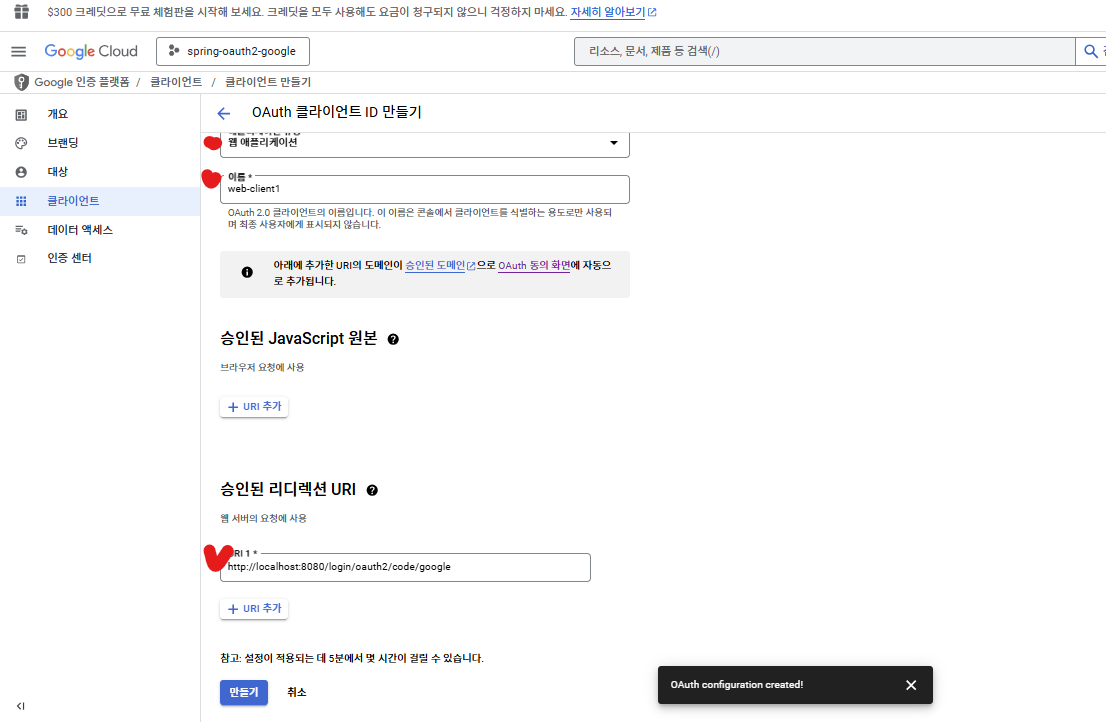
다시 사용자 인증 정보의 OAuth 클라이언트 ID 만들기

애플리케이션 종류는 웹 애플리케이션
이름은 구글의 프로젝트 내부적으로 OAuth 클라이언트 구별용- 내 맘대로
승인된 Javascript원본은 프론트엔드에서 직접 OAuth 요청할 때(react 등) 만 설정
승인된 리디렉션 URI는 카카오랑 동일. application.yml의 값이랑 똑같이.
이렇게 하고 만들기 누릅니다
저장 후 OAuth 클라이언트를 확인해보면
클라이언트ID, 클라이언트 보안 비밀버호, redirect-uri가 보입니다.

각각 yml의 client-id, client-secret, redirect-uri가 됩니다.
google: # ✅ 구글 OAuth2 추가
  client-id: ${GOOGLE_CLIENT_ID}
  client-secret: ${GOOGLE_CLIENT_SECRET}   #구글은 인가코드- access_token 과정에서 내부적으로 secret을 필요로 함.
  scope:
    - profile       #카카오는 profile안의 여러정보 다 따로 지정해줘야하지만 구글은 profile만 지정하면 됨.
    - email
  authorization-grant-type: authorization_code
  redirect-uri: http://localhost:8080/login/oauth2/code/google
데이터 엑세스로 가서 범위(가져올 유저정보)를 선택합니다.
scope의 profile, email에 맞게 선택합니다.
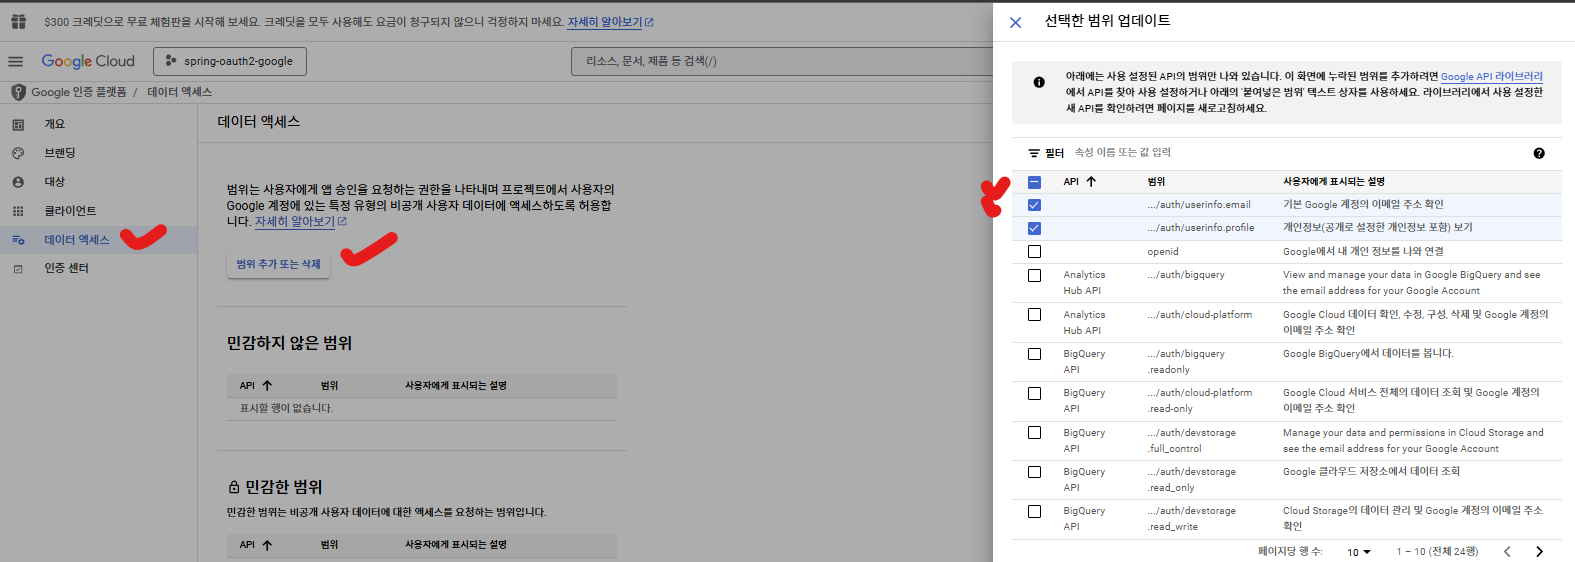
나머지 설정인 authorization : authorization_code는 따로 설정하지는 않습니다.
다만 지금까지 한 구글 OAuth 설정들은 authorization_code방식에 따른 설정방식이었습니다.
OAuth2로그인처리
기존 OAuth2 로그인처리는 카카오만 처리하도록 되어 있었다.
이제는 Oauth2의 리소스서버로부터 받아온 데이터의
attributes 형태가 구글,카카오 등에 따라 달라져서 다음과 같이 처리해야한다.
@Service
public class CustomOAuth2UserService extends DefaultOAuth2UserService {

    @Autowired
    private UserRepository userRepository;

    @Transactional(readOnly = false)
    @Override
    public OAuth2User loadUser(OAuth2UserRequest userRequest) throws OAuth2AuthenticationException {
        OAuth2User oAuth2User = super.loadUser(userRequest);//  user-info-uri 에서 유저정보를 가져옴.
        String registrationId = userRequest.getClientRegistration().getRegistrationId(); //"google","kakao"
        Map<String, Object> attributes = oAuth2User.getAttributes();

       //registirationId는 "kakao","google" 등
       // attributes가  카카오냐 구글에 따라 형태가 다르다.

       if( registrationId.equals("kakao")){

       }else if(registrationId.equals("google")){
       }


    }
}
 구글
{
    "sub": "112233445566778899001",
    "name": "John Doe",
    "given_name": "John",
    "family_name": "Doe",
    "picture": "https://lh3.googleusercontent.com/a-/AOh14Gh...",
    "email": "johndoe@gmail.com",
    "email_verified": true,
    "locale": "en"
}


 카카오
 {
     "id": 1234567890,  문자아님 Long
     "kakao_account": {
         "email": "user@example.com",
         "profile": {
             "nickname": "홍길동"
         }
     }
 }
여기서 각각 구글, 카카오 형태에 맞게 attributes를 처리해도되지만
카카오 구글 뿐만아니라 여러 OAuth2 가 추가되면 코드가 지저분 해지기 때문에
각 Oauth2에 맞는 ENUM을 만들어 각 ENUM에 처리를 위임한다.
OAuthProvider
public enum OAuthProvider {
    GOOGLE("google") {
        @Override
        public UserEntity toUserEntity(Map<String, Object> attributes) {
            UserEntity user = new UserEntity();
            user.setProvider(this.getRegistrationId());
            user.setUsername(this.getRegistrationId()+(String) attributes.get("sub"));  //google15432323
            user.setPassword("{noop}oauth2user");
            user.setEmail((String) attributes.get("email"));
            user.setNickname((String) attributes.get("name"));
            user.getRoles().add("USER");
            return user;
        }
    },
    KAKAO("kakao") {
        @Override
        public UserEntity toUserEntity(Map<String, Object> attributes) {
            Map<String, Object> kakaoAccount = (Map<String, Object>) attributes.get("kakao_account");
            Map<String, Object> properties = (Map<String, Object>) attributes.get("properties");

            Long id= (Long) attributes.get("id");  //카카오는 id가 Long.

            UserEntity user = new UserEntity();
            user.setProvider(this.getRegistrationId());  //kakao
            user.setUsername(this.getRegistrationId()+id);  //kokao15432323
            user.setPassword("{noop}oauth2user");
            user.setEmail((String) kakaoAccount.get("email"));
            user.setNickname((String) properties.get("nickname"));
            user.getRoles().add("USER");
            return user;
        }
    };


    private final String registrationId;
    OAuthProvider(String registrationId) {
        this.registrationId = registrationId;
    }

    public String getRegistrationId() {
        return registrationId;
    }

    public static OAuthProvider from(String registrationId) {
        for (OAuthProvider provider : OAuthProvider.values()) {
            if (provider.getRegistrationId().equalsIgnoreCase(registrationId)) { //대소문자구분없이.
                return provider;
            }
        }
        throw new IllegalArgumentException("Unknown provider: " + registrationId);
    }
    public abstract UserEntity toUserEntity(Map<String, Object> attributes);

}
CustomOAuth2UserService
@Service
public class CustomOAuth2UserService extends DefaultOAuth2UserService {

    @Autowired
    private UserRepository userRepository;

    @Transactional(readOnly = false)
    @Override
    public OAuth2User loadUser(OAuth2UserRequest userRequest) throws OAuth2AuthenticationException {
        OAuth2User oAuth2User = super.loadUser(userRequest);//  user-info-uri 에서 유저정보를 가져옴.
        String registrationId = userRequest.getClientRegistration().getRegistrationId(); //"google","kakao"
        Map<String, Object> attributes = oAuth2User.getAttributes();

        OAuthProvider currentLoginProvider=OAuthProvider.from(registrationId); //GOOGLE,KAKAO   ENUM
        UserEntity userEntity = currentLoginProvider.toUserEntity(attributes);  //oauth2사용자의 user정보

        userRepository.save(userEntity);  //유저정보 저장


        return new CustomUserAccount(userEntity, attributes);

    }
}
이러면 이제 각 provider에서 제공해주는 형태에 맞춰 userEntity를 생성해준다.
우리는 이 userEntity를 사용자정보에 사용할 CustomUserAccount로 return 해주기만 하면 된다.
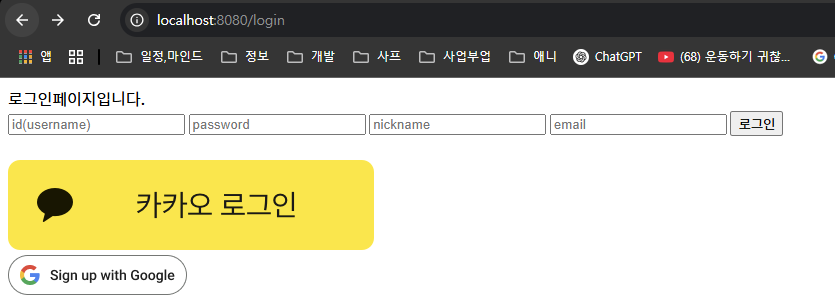
login.html
참고로 구글로그인버튼 이미지는
https://developers.google.com/identity/branding-guidelines#custom-button에서 다운.
<!DOCTYPE html>
<html lang="en" xmlns:th="http://www.thymeleaf.org">
<head>
    <meta charset="UTF-8">
    <title>Title</title>
</head>
<body>

로그인페이지입니다.

<form action="/loginProc" method="post" name="loginForm">              <!--  securityConfig의  loginProcessingUrl("/loginProc")    -->
    <input id="username" type="text" name="username" placeholder="id(username)"/>   <!-- name이 반드시 username이어야한다.  -->
    <input id="password" type="password" name="password" placeholder="password"/>  <!-- name이 반드시 password이어야한다.  -->

    <input id="nickname" type="text" name="username" placeholder="nickname"/>
    <input id="email" type="password" name="password" placeholder="email"/>

    <button type="submit" >로그인</button>
</form>

<br>
<!-- 카카오 로그인 버튼 -->
<a href="/oauth2/authorization/kakao">
    <img src="/images/kakao_login.png" alt="카카오 로그인">
</a>

<br>
<a href="/oauth2/authorization/google">
    <img src="/images/google_login.png" alt="구글 로그인">
</a>


</body>
</html>
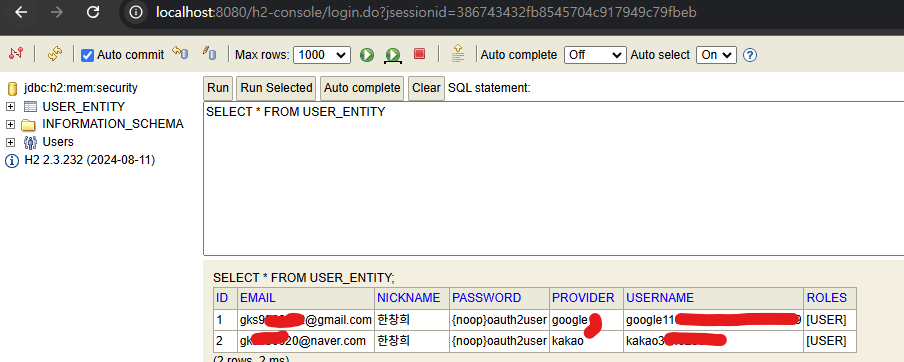
결과

구글로 로그인도 해보고 카카오로도 로그인 해보면 다음과같이
DB에 각 로그인에 맞는 회원정보가 저장된다.